Saturday, December 24, 2011

Merry Christmas Everyone!

I can't believe it's Christmas Eve and I'm still wrapping and trying to finish my cards! It's been a whirlwind of activity around here and I am racing to keep up with myself!  I've told my family and friends that my cards will be late this year and guess what....they aren't even surprised!  I have the best family and the best friends, I am so lucky!!

Next year I will definitely make some cards throughout the year, this is just crazy!  LOL!!  Anyway this is a short post as I still have a zillion things to do before Santa arrives, but I wanted to share a special part of my Christmas memories with you.  My Christmas Angel...isn't she sweet?

I remember saving up my allowance when I was a little girl so that I could get my Mom something special.  I remember walking to 'The China Cabinet', a store in our neighbourhood, it was owned by Mr. and Mrs. Reynolds, and of course back in those days everyone knew everyone. So Mr. Reynolds asked if he could help me.  I showed him my money and said I needed to find something really special for my Mom for Christmas and together we found this little Chrismas Angel that was in my price range. 

He wrapped it up for me and I carried it home and tucked it under the tree, so excited for my Mom to open it up.  My Mom loved it and each Christmas she would unwrap it and display it on the stereo cabinet.  Now my Mom has gone, I have the Christmas Angel and every year I carefully unwrap it and think of my Mom and Dad and the wonderful Christmases we always had.

When I look at my little Christmas Angel, I sometimes wonder if Mr. Reynolds charged me the right amount on that day so long ago....

I hope you like my Christmas Angel memory and I hope you and your families have a wonderful Christmas filled with love, family and friends.  May your days be Merry and Bright!  Thanks for stopping to share your precious time with me!

Love and hugs ~ Judy

Friday, December 2, 2011

Razzleberry Snowflakes

Hi everyone...Happy December!

Seriously .... where does the time go?  I can't believe that it's Christmas in a few more weeks, today we're decorating the tree, I have the Christmas music on and I'm hoping it will start to feel a lot more like Christmas! 

My card today is so much prettier in real life, the silver glimmer paper is such a favourite of mine and it really sparkles on this card.  The card base is Rich Razzleberry and the snowflakes are stamped with the same colour on the base of the card. 

The snowflakes squares are stamped with Rich Razzleberry and Old Olive on Very Vanilla.  The squares are punched out with the 1 3/8" punch and layered on silver glimmer paper punched out with 1 1/4" square punch and they are all layered on black.

The snowflakes are from a Martha punch and the sentiment has a cute little edge, I inserted the sentiment strip into the Modern Label punch (holding the punch upside down and sliding the sentiment in to just shape the edge) and it has a little rhinestone but it's hard to see in the picture.

And to finish it, I added a Rich Razzleberry Bow de Fourchette  I've added a link to my tutorial.  Hope you like it!

Thanks for stopping by, I truly love your visits!

Hugs ~ Judy

Wednesday, November 23, 2011

Frosty nights and warm hearts!

Hi everyone, just a little share tonight, my CAS (Clean and Simple) Christmas card. I have a hard time doing CAS but this one was so easy and I love it!   The picture isn't great...I have a hard time taking photos of my white cards on dark winter days.  The base of the card is Always Artichoke.

The embossed image is a Cuttlebug folder, I painted the rooftops with my Versamark pen and then embossed with Iridescent Ice embossing powder....so pretty in real life!  The sentiment is from the super cute stamp set, Merry Winter and the ribbon is Always Artichoke Seam Binding.

The Whisper White sentiment is punched with the 1 1/4" circle and the layer is Always Artichoke punched out witht the 1 3/8" circle.  Then I drew a little pencil line to hang it from.

Simple, cute and oh so easy! 

Thanks for stopping by!  I love your visits and read every comment that you leave me or email to me...thanks so much!

Big hugs ~ Judy

Friday, November 18, 2011

Santa's Sleigh!

Hi everyone!  I just want to say a quick Hi to all my new subscribers and to tell you how thrilled I am to have you visit me on my blog!  Thanks so much, I love having you here!!

Are you all getting ready for Santa to arrive?  I can't believe how fast Christmas is coming...I really need to start making my lists and checking them twice!

This was such a fun card to make, I used my Sizzix 3D Sleigh die and ran it through my Big Shot and then embossed it with a Cuttlebug folder.


To make the sleigh blades, I adhered tin foil to a white cardstock scrap with a glue stick and ran that through my Big shot again, this time only placing the tin foil on the blade part of the die. Then I adhered it to the sleigh...I love how this turned out!

I also punched out the Triple Flower Punch using the same tin foil scrap and cut it in half for the present bows. I used a piece of the punched out tin foil for a backing under the sentiment, but it's hard to see in the picture.  The presents are little pieces from my scrap pile.
I made the sentiment on my computer with a free font I downloaded called Chocolate Box and then punched it out with a 1" circle punch. The snowflake is from Season of Friendship stamped in Whisper White Craft ink.   I lined the edge of the sleigh with Tombow and added Silver Glass Glitter....so pretty!!  The ribbon is Real Red Satin and the cardstock is Black and Real Red.

I hope you like my Santa Sleigh....thanks so much for stopping by to share your time with me!

Hugs ~ Judy

Tuesday, November 8, 2011

Vintage Skates

Hi everyone!
Ohmigosh...I can't believe that I haven't blogged for so long!!  It's been busy around my house...lots going on and I have lots of things made that I have stacked up to share with you! 

I wanted to share this card with you today...I just love it!  I couldn't sleep one night and lay there thinking about the stocking punch and what I could make with it and I came up with these ice skates...they are just too sweet and I'm thrilled with the way they turned out!!

They are fairly easy to make, but the detailing takes a bit of time, I think it's worth it though!  Here's how I made it:

Cardstock is Pink Pirouette (top layer is embossed with Vintage Wallpaper) and Whisper White, the skate blades are Basic Gray and punched out with the Word Window Punch. The little bits attaching the blade to the skate are just little pieces of Basic Gray I cut.

To make the skates, punch out 2 stockings in Whisper White and 2 stockings in Soft Suede.  I cut the brown stockings off so that I could layer them behind the white skates and they wouldn't show except where I wanted the sole of the boot to show.  I cut a heel from the excess of the brown that I cut away.

I pierced 10 holes up the boot and then threaded white bakers twine in an overhand stitch up the boot.  I  tied a separate piece in a bow and glued that on each boot with Tombow.  The skate is sponged with Close to Cocoa and then I added pencil dots up the skate and around the heel to look like the stitching that I remember on my own old skates.  Then to finish the skate I cut a tiny piece of Victoria Crochet Trim and then cut it lengthwise to add to the top of the skates.

To finish, I added a bow with the Very Vanilla Seam binding, small silver glitter stars and 1/4 inch punch outs to look like snowflakes. The sentiment is from Short and Sweet.

I hope you like my vintage skates!  Thanks for stopping by to share your time with me...I love your visits and your comments!!

Hugs ~ Judy


Tuesday, October 18, 2011

My Little Witchling!

Here's a quick and fun Halloween card to share with you!  I'm not sure who makes the image of the little girl, I found it while I was Googling around.

 
I thought the image was just so sweet! First of all I embossed the frame from the stamp set Frame It, using black embossing powder on black cardstock.  Then I cut her out and mounted her behind the frame, poking the top of her hat out of the frame.  The background is wheeled in black with the Web Wheel on Tangerine Tango. 
Boo is from Spooky Bingo Bits and I mounted it on the Blossom Bouquet Triple Layer punch piece.  I love how that punch gives a teeny bit of a border.
I hope you like my sweet little Witchling!  Thanks for stopping by, I love your visits and I appreciate the time you spend with me.
Hugs ~ Judy

Tuesday, October 4, 2011

Halloween Box

Hi everyone! Happy October!

Here's a sweet little treat box to share with you today, I used the Box #2 die...love that die!!  I lined it with my Halloween words, if you'd like a copy just shoot me an email and I'll send you the word document.  You can save it to your computer and then print it off on computer paper for an envelope liner or on cardstock which is what I used on this little box


I used the retired Pumpkin Pie ribbon for the bow (see my bow de fourchette tutorials here) and the cobweb border is a Martha punch.  I found the glittery spider at the dollar store.  So easy and quick to make...perfect for giving a treat to someone special!

Thanks for stopping by today to share your time with me!  Hope you like my little treat box!
Hugs ~ Judy

Friday, September 30, 2011

Covering up my mistakes!!

Well, here we are on the last day of September! I can't believe how fast time is flying by. I'm very excited about October coming up. It's one of my favourite months, the leaves are starting to turn colour and it's time to cozy up by the fire with a good book or to tuck yourself up in your crafting space and create!

Here's a card I've been meaning to share with you, I really love it and I created it by trying to cover up the couple of mistakes I made!   Can you see them?   If you click on the picture you might find some of them! But mistakes are always...well most always (lol) good, it makes you think of how to save your card and sometimes it turns out better than you expected!

First of all I tore the Newsprint designer paper and layered it on the White cardstock, then I stamped the beautiful wooden bench from 'Have a Seat' over the seam....ugh...it looked awful!  So I ran it through my Vintage Wallpaper Embossing folder and it looked worse!  I ran a light sponge over it all and punched the label to hide the bench. But while I was sponging the embossed background, some of the black ink got on the heel of my hand and made a blotch so I covered it with the birdcage.

I took out my Fabulous Florets and did the reinker technique. I embossed the flowers in black and coloured them with Cherry Cobble reinker.... but couldn't find my embossing buddy sooo of course I got some black bits inside the flower petals....so I got out my Cherry Cobbler marker and added some details to cover up the black embossing bits...I like it!! 

To finish it up, I added a little red bird to balance the flowers and needed some Little Sizzlet leaves to cover the bench leg that was still sticking out!

I had some trouble with this card but really, really like how it turned out!  Isn't it amazing how you start out going in one direction and all of a sudden you are doing something completely different!  That's what I love about crafting and life...full of surprises...LOL!!

Thanks so much for stopping by and sharing your time with me!  I love it when you have time to visit with me!!

Hugs ~ Judy


Sunday, September 18, 2011

Finally....

Hi everyone! I've had so many lovely comments on the anniversary card I made for my daughter and son in law, I just want to say thank you so much for letting me know how much you liked my card! I love your comments and emails and read every one!

Here's the tutorial on how I made the roses, oh my, I said next week and that was 3 weeks ago...so sorry for the delay!! I started out by quilling the roses from scraps and then when I finished, I realized they wouldn't fit in the envelope and so I had to come up with plan B. My Tombow glue was sitting on my craft table and so I reached for it and here's what happened!


This is a picture of my quilling tools, I got them at my local big craft store, if you can't find any of these little tools near you I'm sure you could make your own by snipping off eye of a tapestry needle and inserting it in a soft wood dowel. Anyway, I found 2 and I gave the blue one to my daughter...mine is the little metal one...I love it!

This sample is Whisper White... I've tried to pick the best pictures that my daughter took while I was making the tutorial!
I punched out circles from scraps, these are really small roses.....this one is Very Vanilla stamped with En Francais background in Crumb Cake. Then I cut the circle in a spiral to the centre...

So I basically cut with my scissors in a spiral, just randomly and left a little piece at the end for a glue dot...this is what it looks like when I'm finished cutting.


I insert my quilling tool on the very tip of the outside edge and start to roll.....

and roll.......

and roll.....


When I'm finished rolling it all up, I let it rest on my finger tip to let it relax and unroll just a bit ...


Then I place a glue dot on the end....

And press it gently so that it catches the rolled layers of the flower at the base.

 
This is what it looks like....pretty eh?

This is me looking at it and thinking that it's going to be a very lumpy envelope.....oh and also a very unattractive picture of my fingernail...it got smashed in a door years ago when the wind caught it just as my son (who was about 3) was running through it....so I of course put my hand out to stop the door from slamming on him...it slammed on my finger instead!


And here is where I spotted my Tombow and thought hmmmmmm....


Here's me really applying pressure with the bottom of the tombow to smash my pretty rose....


And here....gasp....the reveal!! I love it....I think it's beautiful and it will fit into the envelope as well!


This is a picture of a 3/4" Wisteria Wonder smashed rose...it's pretty just as it is or would be lovely with a dab of Dazzling Details, or Dazzling Diamonds or even a pearl in the centre.


This is just to show you the two sizes I used for the anniversary card and of course those roses were all in white. You could make them any size but the bigger the circle the bigger the smashing tool would be...even the bottom of a jar would work great.


And since this is such a long tutorial...what the heck....I'm including a close up picture of the finished rose that's got the En Francais script stamped on it...so pretty!


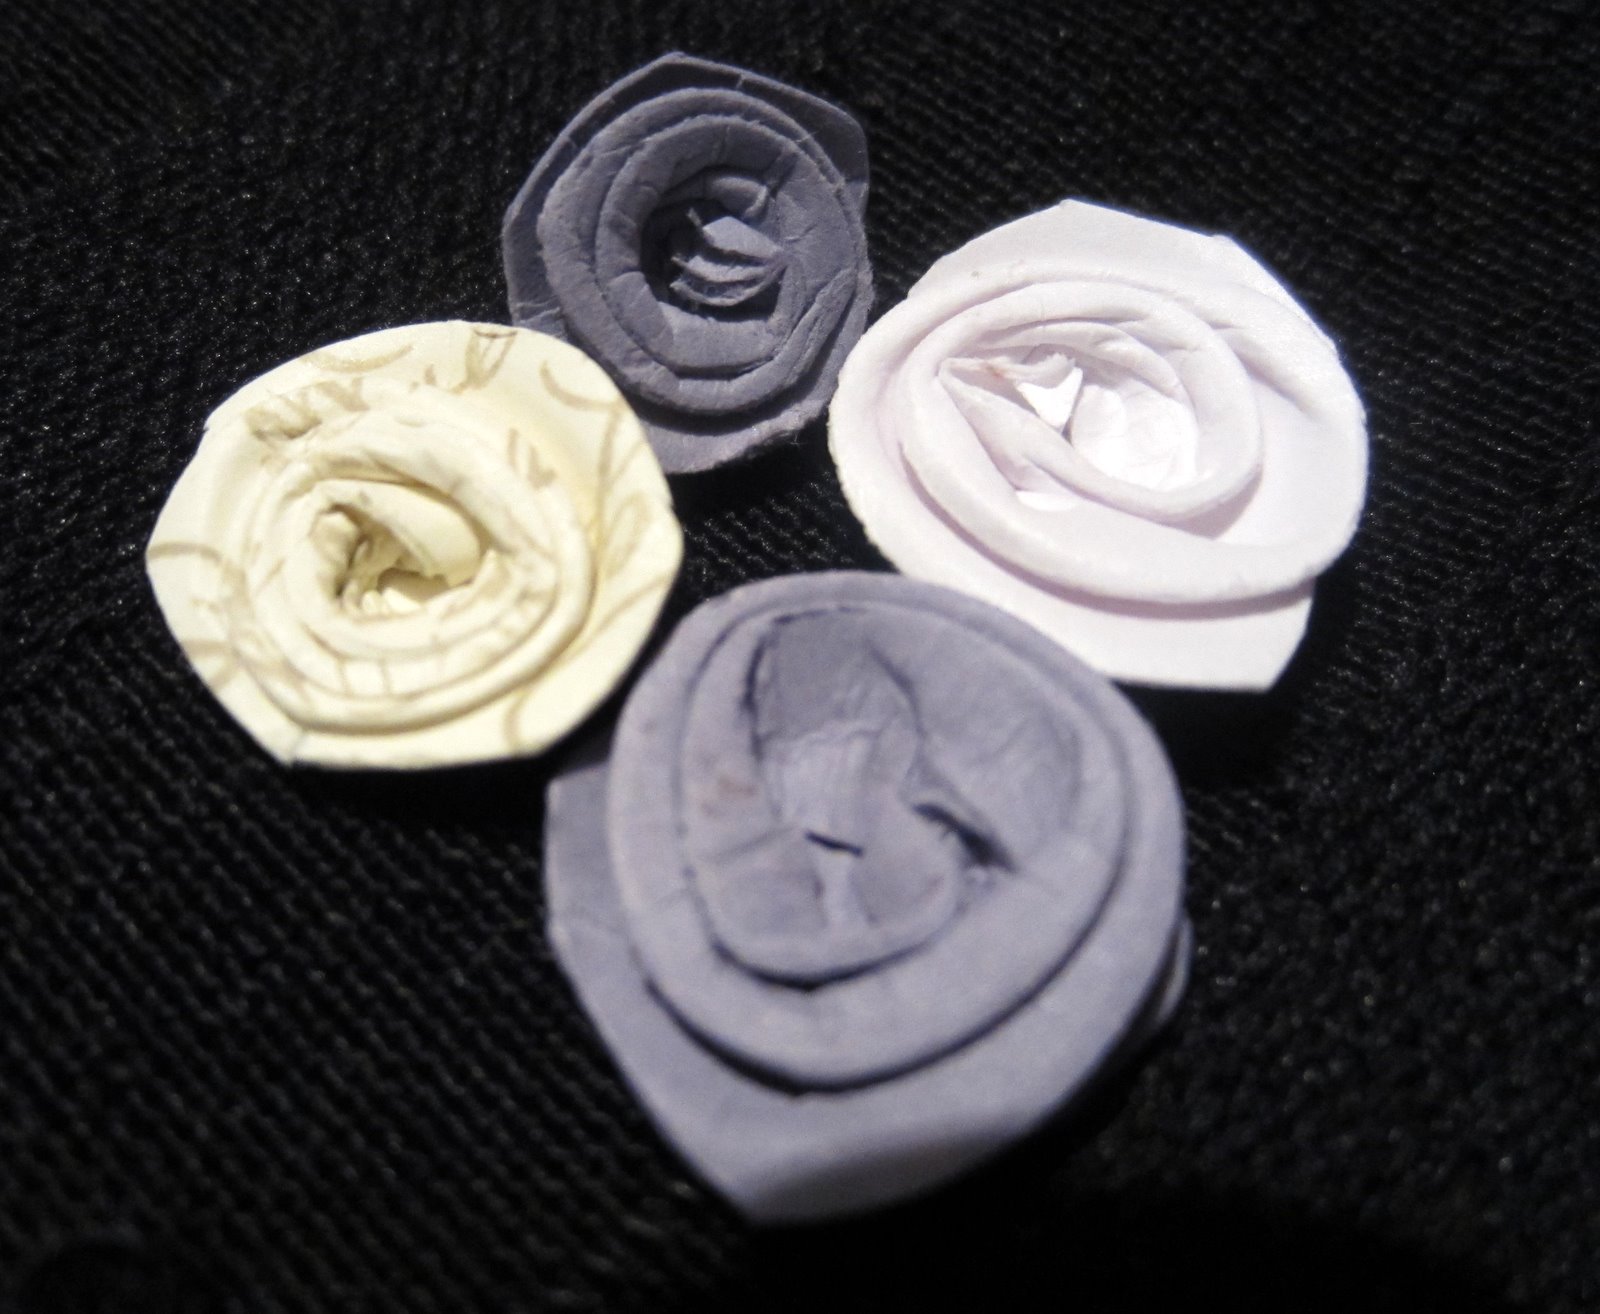
And to finish, I' m including a picture of a little grouping of my smashed roses, as you can see they turn out a little different every time! I hope you like them and enjoyed my long tutorial and hope you try to make some too...don't throw out your scraps...they are perfect for making these little gems!
Thanks so much for stopping by and sharing your time with me!
Hugs ~ Judy

Wednesday, August 31, 2011

How do you like these roses?

Hi everyone...ohmigosh...it's the last day of August, I can't believe it! The weather is beautiful and next week the kiddies are back in school and it seems like its the time to settle down to a routine.  I honestly don't know what a routine is, but it sounds good!

It was my daughter and son-in-laws 4th wedding anniversary a couple of weeks ago and this is the card I made for them.  I had so much fun making these little roses....I've been calling them smashed roses althought that's not really a great name, but it's how you make them!  I hope to have a tutorial up next week on how I made these, they are so much fun and so addicting!


The background is embossed with an embossing folder I picked up a few weeks ago  The oval is a Nestability and the sentiment is a retired Stampin'Up set called Everything Nice.  The leaves are from an old punch I have and the ribbon is Stampin' Up!  Whisper White Satin.  I used the new Dazzling Details on the inside of the roses too....love this new product!

Hope you like it and I hope you are enjoying these last days of summer....I wishing for an Indian summer, beautiful sunny days, not too warm, lovely coloured leaves on the trees and that wonderful crisp smell to the air that we sometimes get in September....and no rain would be lovely!! 

Thanks so much for stopping by to share your time with me!  Crafty hugs to you ~  Judy

Tuesday, August 16, 2011

Summer Splash Tag

Happy Tuesday!  Here's another tag to share with you, I am using the Summer Splash stamp set again....I think it's so darn cute! 

I stamped the surfboards with the new and fabulous Calypso Coral Ink on Naturals White cardstock. Then I tore a piece of Crumb Cake cardstock and sponged it with Basic Brown ink and did a couple of layers and adhered them to the tag. 

I ran a glue pen over it and sprinked the decorator sand on top.  I got the decorator sand in the floral department of Michaels...I could have got some from the beach, but I figured the sand in the bag would be cleaner...not so germy...lol!!


I got the little starfish in a jar from a furniture store...mind you it was a couple of years ago, the store was Urban Barn (in Canada) and it was in the candle section...you never know what kind of goodies you might find on your travels!  I had no idea what I was going to do with them until I got this cute stamp set! 

The sentiment is from the stamp set Thank You Kindly and the ribbon is our yummy Crumb Cake Taffeta ribbon....I am so glad this colour ribbon came back!!

Thanks so much for stopping by, hope you are having a wonderful week!
Hugs Judy

Saturday, August 13, 2011

Summer Splash

I love this little stamp set!  This 4" x 4" card was so much fun to make... I added a strip of Marina Mist satin ribbon and then added the Marina Mist scallop circle and the 1 3/8" white circle punch on top after I stamped the sand pail image in Marina Mist. I stamped the sand pail again on Marina Mist cardstock and cut it out and popped it up with dimensionals. To add a bit of dimension I dotted green tombow glue to the inside of the pail and sprinkled clear beads on top...kinda looks like sea foam bubbles!  If you click on the picture you'll get a close up view {g}

Then I coloured the sand area with Crumb Cake marker and added glue pen over it and sprinkled some decorator sand on top...so cute in real life!  The sand dollar is stamped in Blushing Bride and cut out with the Itty Bitty circle punch and the shell is stamped in Crumb Cake and cut out.


I cut the inside layer at 3 3/4" x 7 1/2" and folded it in half.  In the middle of the scored side I placed a 1" square of cardstock and cut from the fold side up to 1" on either side of the square template.  This forms the little pop up...so cute eh! 

I stamped the sentiment from the stamp set Bold Blossom...both of the sets are in the current Summer Mini.  Then I added some more little cut out pieces.  I hope this all makes sense...I'm tired tonight! LOL!!


I hope you like todays card and hope you give the easy little pop out card a try!  Thanks for stopping by and sharing your time with me!  Hope its sunny and warm wherever you live and you have a beach close by to play at!

Hugs ~ Judy

Thursday, August 4, 2011

Lovely Roses

Hi everyone!   Here is a card I made using the Re-inker Spread Technique created and generously shared by Crystal French.  It's such a fun technique to do and I've include the instructions below for you.   I found it's really important to use the Shimmery white cardstock as the water pools really nicely on it and after it's dry you can see the shimmer through the paint....totally fun! 

The stamp set is Fifth Avenue Floral and the leaves are from Autumn Spendor.  The sentiment is retired.  I used the Tulip Frame Embossing folder and it's always a perfect addition to any card!  I was thinking after I'd finished this card that I should have embossed the photo corners too.


Embossed Reinker Spread Technique by Crystal French
  1. Stamp an outline image with white craft ink or Versamark onto Shimmery White cardstock.
  2. Sprinkle with white/black embossing powder and pour excess back into container.
  3. Heat with heat gun until powder melts; let cool.
Now you're ready to go ahead with the "Reinker Spread Technique


Reinker Spread Technique:
  1. Choose 3 colors of Classic reinker. Put a drop of each reinker in separate well in a paint tray. 
  2. Have a misting bottle filled with water, an aqua-painter and a paper towel ready.
  3. Spray the embossed shimmery cardstock with water until it is saturated and there are pools of water in the embossed areas.
  4. Moving quickly, dip the aqua painter into the darkest color of reinker and tap it into a pool of water on the embossed image. The reinker will spread across the pool of water. For the best results, start in the center of a flower or the edge of the image to allow the reinker to flow across the image.
  5. Reapply reinker after each dip and continue with the same color as desired
  6. Clean the aqua painter and start with the second and then the third color.


Here's a sample of other colours I used, the half rose on the left is done with only Calypso Coral and I just played with different intensities....pretty eh!  The half rose on the right turned out so cool, I couldn't believe the way the colours mixed together, beautiful shades of pink, blues and purples....love this one! 


I love the soft colours of the samples below too...it's amazing what it looks like as you're doing the technque and then it looks different yet again once it's dried.

The rose below shows how your painted piece will look before it's cut out....not that great looking but once you've cut it out and mounted it on your card with dimensionals, it's totally fantastic!
 Just a little tip from me to you....and this is what I've learned to do {g} when I'm stamping flowers, I usually stamp a whole sheet and then when I paint them, I jot down on my flower what colour combos I've used, then when it comes time to use them to make a card, I don't have to rely on my ever fading memory and it's super easy to match up colours.


I really hope you give this Wow technique a try, it's really fun and easy and so impressive in real life!
Thanks so much for stopping by and sharing your time with me!
Hugs ~ Judy

Friday, July 29, 2011

French Foliage....my fave!!

Hi again...another quick share for you today! This is one of the tags I made for my customers orders last time...I absolutely love the stamp set French Foliage and one of my fave colour combos is Very Vanilla and Crumb Cake Ink....love it!


The background of the Very Vanilla tag is stamped with the script from the stamp set and the sentiment is from the stamp set Thank you Kindly...it is a perfect on this tag!

The flower is from my stash, I found package of them at the local Dollar store....I should have bought more, they are so pretty!
The ribbon is also from my stash....I have lots of goodies in my stash, it's like a treasure trove!
Thanks for stopping by and sharing your time with me!

Hugs ~ Judy

Wednesday, July 27, 2011

Hello!! Happy Summer....

Wow...where do I start?  I've been away from blogging for over a month....but I'm back!  First I want to say thank you so much to everyone who has subscribed and left messages on my blog and to give a warm welcoming hug to all the newcomers!  I love having you here with me!

My summer has been crazy busy so far, but lots of fun.  We've had two sets of company come to stay with us which was fun in spite of the weather not really cooperating.  We've also been away to Whistler for a mini holiday and had some birthdays to celebrate too.

This is what summer is like for my darling LilyBean!  She's found a new spot, the little padded bench on my stairway landing.  She's so sweet and happy all the time!  Life is wonderful,  all a girl has to do is tuck up in the cushions and keep a lazy eye on what everyone's doing!  Oh and to check on her own pot of catnip on the balcony...that's important too!

I finally got a new camera and I love it!  It's a Canon Power Shot Elph 300and it's super easy to use and takes great pictures.  I  have a video setting on it too, so I'll have to give that a whirl and see what I can do with it.  I've taken some pictures of some cards I've been making so I'll have to share those in the next day or two. 

Here's a little share for you....I ran out of my Stamping Mist between orders ages ago, so I found this recipe online for stamp cleaner.  It works great and what I really like it for, is to refresh the baby wipes I use to clean my stamps...sometimes the baby wipes dry out on me as I haven't closed the latch properly! I keep it in a spray bottle and it works great.  I'm not sure who the created the original recipe, if anyone knows, I'd love to give proper credit!  I bought all the ingredients at my grocery store.

Homemade Stamp Cleaner

1 cup Distilled Water
1 1/2 Teaspoons Baby Wash
1 Tablespoon Glycerine and Rose Water

ETA...ooops....so sorry, I just changed the above... that should be 1 Tablespoon of Glycerin and Rose Water!!  Thanks so much Angie for catching that for me!!  You are so sweet and I really appreciate your email!! Big hugs!!

Thanks so much for stopping by and sharing your time with me! 
Hugs ~ Judy

Thursday, June 23, 2011

Daffodil Delight....so easy!

Hi everyone...wow, it's been so busy around here! I have lots of cards to show you but my camera is broken! 

The lens will only come out a tiny bit so it doesn't even focus.  I took it to the camera shop, thinking maybe they could fix the little lens thingie and no, they said it would be cheaper to buy a new one...sigh...it seems everything is disposable these days. 

So tomorrow we're going camera shopping...my new one has to be super easy to use, I don't like reading instructions, in fact I use them as a last resort!

My card today is such a quick and easy one to do.  I used the retired set Easter Blossoms from the last mini, but you could use the same design with lots of stamp sets. 

I stamped the blossoms in Daffodil Delight on Daffodil Delight cardstock and then stamped a whole sheet of blossoms on white, then cut it into strips for future cards. Then the blossoms are coloured with the Daffodil Delight marker.  Added a bit of ribbon and a sentiment and it's done!

Thanks for stopping by! 
Hugs ~ Judy

Thursday, June 9, 2011

Pretty Butterfly

Happy June everyone...I can't believe how fast the time flies by!   It seems that I'm on the go all the time!  We've finally had some nice sunny weather on the west coast although it's been cloudy in between....it just makes me enjoy the beautiful days even more when we have to wait for them!

Here's a quick share for today, it's one of my favourite new sets in the Summer Mini, it's called Strength and Hope...isn't it pretty?  I love it!! 


The colours are Tempting Turquoise and Very Vanilla.  I stamped the Very Vanilla with the En Francais background in Crumb Cake and then over stamped the swirls in Tempting Turquoise. 
I addded Turquoise glitter to the butterfly as well as fine wire antenae's.  The label is stamped with the new stamp set from the upcoming catalogue called Four Frames and the sentiment is from Clearly for You...I just love this pretty little set and the little roses and leaves are from the Baby Blossoms stamp set....I can't believe it's now retired.  Love this little set...it's a keeper!
Thanks for stopping by to share your time with me!  Hopefully I'll be blogging more often in the coming weeks! 
Hugs ~ Judy


Wednesday, May 25, 2011

My Flower Fairy

Hi everyone....wow...it's been ages since I last posted to my blog!  It's been a super busy month and I've had some computer issues which my computer guy fixed, then the printer bit the dust and I'm not really a printing maniac but seriously...when you have no printer it's just awful!

Then we got a new wireless printer and of course, our laptops were having a bonding issue with the printer, it worked fine when the computer guy was here...Murphy's Law!  Thank goodness for my son who is a computer whiz and has managed to get them to recognize each other...now the router is pouting and doesn't want to play nicely so I have to run downstairs, unplug everything, say a few words (#%#@*&), plug everything back in and we're able to print...until tomorrow anyway! 

So this sweet little card is an escape to my little Fairy Garden, where there are no printers, laptops or anything techie at all!  I just love this card, I used the Flowers Awash stamp set and the sweet little face, legs and arms are from All in the Family. 


The ink I used for the outline stamping was Marina Mist and the fill colour of her dress is Bashful Blue, the flowers are filled with Pretty in Pink and Bashful Blue ink and the leaves are Certainly Celery.  I coloured her shoes with a Bashful Blue marker and added rhinestones to her toes. 

The embossing on the card is done with the Tulip Frame Embossing Folder and the scrunchy ribbon is from my stash. 

Thanks so much for stopping by to visit me in Fairyland and being so patient while I've been busy!  I hope you're all having a wonderful week!

Big hugs ~ Judy

Friday, April 29, 2011

Strawberry Ice Cream anyone?

Wow...I have been so busy this month...I can't believe that tomorrow's the last day of April and I've only blogged a couple of times!  Tomorrow is my card buffet so I'll have lots of goodies to share with you really soon! 

As soon as I got my Petal cone die, I wanted to make an Ice Cream Cone card with it and I found this card when I was 'Googling' around and I thought it was absolutely darling so I cased it...isn't it sweet? I love how Holly used the trim from the Tasteful Trims die for the Ice Cream base.  Mmmmm...I just want to give it a big slurp, strawberry ice cream is one of my favourite things!!


I used the Petal cone die (of course!) and Crumb Cake carstock, first I ran it through the die and then I ran it through the Big Shot again with the Perfect Details Texture plate.  Then I sponged the cone in my old fave retired ink...Close to Cocoa.

I used Pretty in Pink for the strawberry ice cream, trim and banner and sponged it with Melon Mambo.  For the banner I used Happy Birthday from Something to Celebrate (Level 2 hostess set in the outgoing Occasions Mini)

The ribbon is a bow de fourchette using ribbon from my stash of ribbons.  Hope you like it!

Thanks for stopping by to share your time with me!
Hugs ~ Judy

Monday, April 18, 2011

Cottage Rose

Hi everyone...I hope you had a great weekend!

Here's another one of my cards...I really liked how it turned out!  I watched Valita's video on how to make a rose with the 2 step Owl punch...such a great idea. I love it when I can use my punches for lots of things.  And roses are one of my favorite flowers, my Dad used to grow all kinds of roses and had them planted in all of the gardens.  So many colours and varieties!

Each petal is the body of the owl, trim off the feet, shape the petal with your bone folder, sponge the edges and then slit about 1" into the head side, overlap and glue the flaps together with Tombow glue.  Each rose takes 8 owl bodies and then the center is the XLarge Scallop Circle, cut into a spiral and rolled up to fit into the middle.

I used my seed packet template again (last time I used it, I did Sweet Peas and Pansies) and changed the wording to Cottage Rose and printed it on Sahara Sand Cardstock. If you'd like the template, I'd be happy to send it to you, just shoot me an email (the link is on the right hand side of my blog), I still can't figure out how to actually  put it on my blog!  I used Autumn Splendor for the leaves and stamped the image on Old Olive with Old Olive Ink.  The cardstock base is Rose Red, embossed with the Tulip Frame Embossing folder.

I  hope you like my card!  Thanks so much for stopping by and sharing your time with me!  Have a great week.! 

PS...Just a little reminder....there's a Full Moon tomorrow (Monday) so don't forget to make a wish for your heart's desire while you're admiring it's beauty in the night sky!  I always wish on the Full Moon...it's definitely one of my favourite things!

~ Bye

Thursday, April 14, 2011

Queen for a Day!

I found this card from Lee Ann Greff and fell in love with it... I love the technique of outline watercolouring and the soft daintiness of her card...so I cased it! 


I used Baja Breeze and Very Vanilla Cardstock, I ruffled the Baja Breeze Seam binding by pulling a center thread at each cut end of the ribbon and gathered both ends towards the middle.  The stamps I used were En Francais Background, Growing Green and You're a Gem.  The inks I used were Crumb Cake, Baja Breeze and Pear Pizzaz.

I also used the fabulous Tulip Frame embossing folder...when I first saw it in the Occasions Mini, I wondered how much I'd use it, but being an embossing folder maniac {g} I had to have it and I use it soooo much!  I absolutely love it and it makes any card just pop!

For the Watercolouring Outline, I used reinkers and dipped my aqua painter in the puddle of ink and then coloured inside the stamped outline...isn't it pretty?  It's really a quick and easy card to make and so much fun to see it take shape with the painting...try it...you'll love it!!

Thanks for stopping by, I love it when you spend a few minutes of your precious time with me!

Hugs ~ Judy

Wednesday, April 13, 2011

For the guys!

Do you find it hard to make a card for the guys? I sometimes do! This stamp set, (Countryside) is perfect for a guy card and I had so much fun making it. My goal this year is to practice my watercolouring...kind of a fun goal! 


I stamped the image in Basic Brown on Watercolour paper, then painted using my Close to Cocoa (can't seem to give that colour up!) and my aqua painter. I made the clouds by sponging a punched out piece of the scalloped circle, sponging on the circle then out to the watercolour paper, moving the scallop to different angle to create the clouds.

I sponged the edges of both layers with Basic Brown and then layered the Kraft on Kraft and ran it through the lattice embossing folder.  Then I mounted the finished watercolour piece on and adhered it to the small Kraft base and then both layers to the card base. 

I used a scrap of watercolour paper for the greeting that comes from the newly retired SAB set 'So Happy for you'. 

Hope you like my watercolouring....I had so much fun making it!  Thanks for stopping by and sharing your time with me!

Hugs ~ Judy

Thursday, April 7, 2011

Hello Peeps!

It's been so long since I blogged...I've missed you and hope you've missed me a tiny bit too!! I've been busy having classes and sneaking in a wonderful little getaway to Victoria with my family! So much fun!

We had beautiful weather while we were there, we did lots of shopping, including stopping at all of my fave spots, the Fairmont Empress store, Murchies Tea Store, Rogers Chocolates, the Irish Linen store and of course a stroll through Fan Tan Alley in Chinatown...we came home with lots of shopping bags and lots of pictures.

I have a little share for you today...here's a cute little watering can I made. I found the template on Splitcoastampers...isn't it sweet? I printed it out on Pretty in Pink cardstock and stamped the Baroque Motif swirl on the sides in Close to Cocoa and added some white dots with my Gel Pen. (You can click on the picture for a closer look) The flowers are made with White Tissue Paper using the Island Floral Die and the leaves are handcut.


I hope you like my little watering can....it's time to get out the real thing and get ready for spring! We actually had snow here the day before yesterday, it didn't last, I thought it was going to when the snow plough drove up my street (!) but thankfully it went away just as suddenly as it came. My daffodils and I are extremely happy about that! LOL!!

I really love Spring, there is such excitement in the air, waiting and watching for all the little buds to blossom out in all their beauty. Waiting for the first little crocuses and daffodils to poke their little heads out of the ground. My tulips are starting to come up in my front garden, much to the delight of the neighbourhood deer....the little darlings have munched the tops all off!

My favourite season is Fall, but my second favourite is Spring....with all it's anticipation of warm days and blooming cherry trees, it always feels like the city is getting ready for a big wedding, the streets are all lined in pink trees and after the blossoms are finished the petals dance through the air like pink confetti...beautiful and so very pretty! I love where I live!!

Wishing you lovely days too....thanks so much for stopping by to share your time with me!

Hugs ~ Judy

Thursday, March 17, 2011

Happy St. Patrick's Day!

Hi everyone....I hope you're having a wonderful day wherever you are!  St. Patrick's Day has always been a special day for our family....who doesn't have a little Irish in them, especially on St. Paddy's Day!

We always had a huge party on St. Patrick's, my uncle was Irish and oh how he loved to celebrate for the occasion.  We would all get together, the Irish music would be blasting, the drinks flowed freely, even for the kiddies (non alcohol ones for the wee ones, watered down for the middle ones, and straight up and strong for the adults! 

We would dance and sing and keep an eye out for the leprechauns...everyone knows they can't help but come out when the music and drinks are flowing!

This is an ATC (Artist Trading Card) I made, the sticker on it has the same symbol as the ring my husband bought for me years ago.  The symbols on my Claddagh ring stand for Love, Loyalty and Friendship....so pretty!
 
May you always have
Walls for the winds,
A roof for the rain,
Tea beside the fire,
Laughter to cheer you,
Those you love near you,
And all your heart might desire!

Have a wonderful day, full of laughter and love and watch out for the wee folk!  If you manage to catch one, remember that you'll get 3 wishes and no more from them....they are very tricky when caught!

Thanks for stopping by to share my memories!
Hugs ~ Judy

Wednesday, March 9, 2011

Crepe Paper Tags

Brown paper packages tied up with ribbon...what could be better?

I love to wrap up my orders, I think it's so much fun to be able to unwrap a pretty bag of goodies...this is what my last months orders look like! 

The tag was so much fun to make, I used Early Espresso 4" x 2 1/4" and layered it with Very Vanilla 3 3/4" x 2",  this makes a perfect sized tag. 

I inked up the Music Notes wheel with Close to Cocoa and wheeled it on the Very Vanilla...I just can't give this colour up!  LOL!!  Then I added a little strip, the sentiment is from the Short and Sweet Stamp set, I curled it with my fingers and inked the edges.  Then I dovetailed one side with my scissors, adhered it with a glue dot and added a pink button from my stash.


The edging on the side is made with pink Crepe paper from the Dollar store.  I put sticky strip down on the back and gathered it up while sticking it down... isn't it pretty?  This is a great way to add a bit of softness but not bulk.  To finish it I added some ribbon to tie it to the bag.
I love it...hope you do too!
Thanks for stopping by!
Judy